

In the world of digital analytics, Google Analytics 4 (GA4) is your go-to for understanding user behavior, but raw data can get messy fast. Enter IP filters—a key feature to exclude internal traffic like your team’s visits, ensuring you track clean, accurate data from real users.
Quick Check: Before creating filters, confirm your current IP address with our IP Checker Tool.
It helps you avoid blocking the wrong traffic when setting up Google Analytics 4 filters. Whether you’re an SEO pro optimizing campaigns or a marketer analyzing conversions, mastering IP filters in GA4 prevents skewed metrics and sharper insights.
I once set up GA4 for a small e-commerce client without filtering internal IPs, and our “top pages” report was dominated by our own testing sessions. It was a classic beginner blunder that wasted hours—don’t let that happen to you. Let’s break it down step by step, updated for 2025’s GA4 enhancements.
Why Use IP Filters in Google Analytics 4? The Case for Clean Data
Without IP filters, internal traffic from employees, developers, or bots can pollute your reports, inflating pageviews and distorting user journeys. In 2025, with AI tools like ChatGPT-5 automating more site tests, this issue is amplified—internal sessions can account for up to 30% of total traffic in some setups, leading to inaccurate data.
Clean data means better decisions: Spot true engagement trends, refine SEO strategies with tools like SurferSEO, and automate reports via Zapier without manual cleanups. Stats show that organizations prioritizing data accuracy see 20% higher ROI on marketing efforts. In a year where privacy regs like GDPR updates demand precision, IP filters are non-negotiable for trustworthy analytics.
Step-by-Step Guide: Setting Up IP Filters in GA4
GA4 handles IP filtering through “internal traffic” definitions and data filters—it’s not like the old Universal Analytics views, but it’s more flexible. You’ll need Editor access to your GA4 property. Here’s how to do it right.
Step 1: Define Your Internal Traffic Rules
✅ Need to double-check your network or connected devices? Try our Advanced IP Scanner to identify every IP in your workspace before applying filters.
- 1. Log into GA4 and go to Admin > Data Streams.
- 2. Select your web data stream.
- 3. Click Configure tag settings > Show more.
- 4. Under Define internal traffic, click Create.
- 5. Name your rule (e.g., “Office IPs”).
- 6. Set the traffic_type parameter to “internal” (or a custom value like “team_traffic”).
- 7. Choose a Match type for IP addresses (e.g., “equals” for single IPs, “is in range” for groups).
- 8. Enter your IP address or range in the Value field—use CIDR notation like “192.168.1.0/24” for ranges. Supports IPv4 and IPv6.
- 9. Add more conditions if needed (they use OR logic).
- 10. Click Create to save.
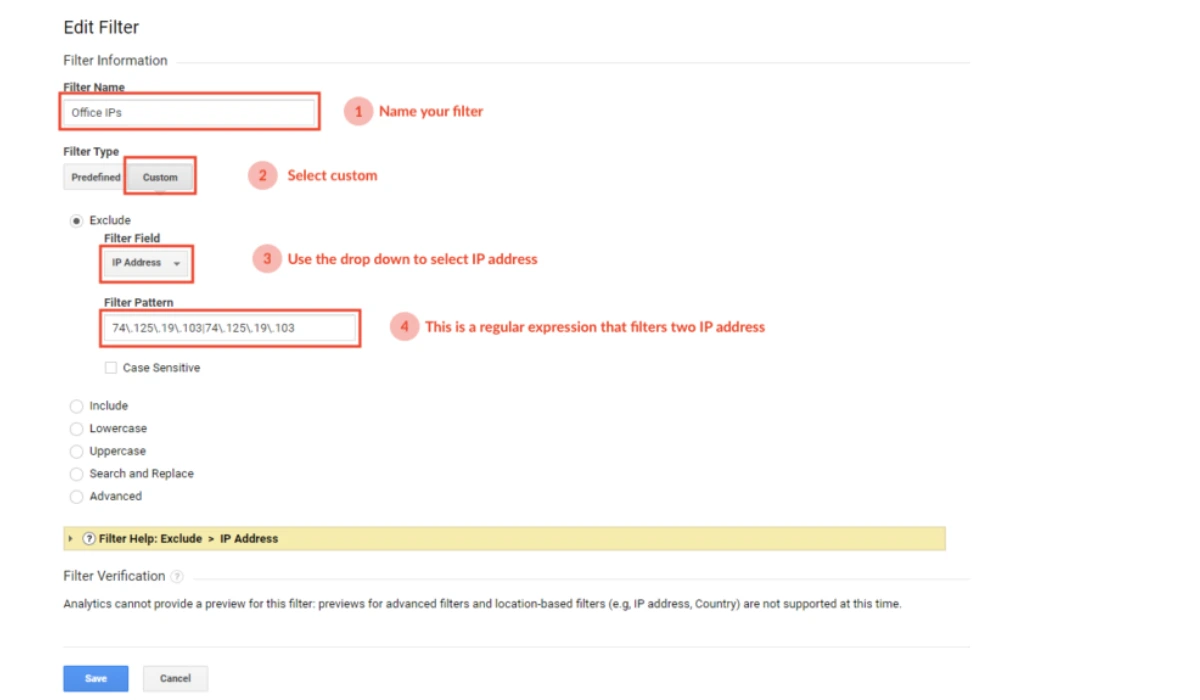
Step 2: Create and Activate the Data Filter
- 1. Back in Admin, go to Data filters.
- 2. Click Create Filter > Select Internal Traffic.
- 3. Name it uniquely (e.g., “Exclude_Internal”).
- 4. Choose Exclude to remove matching events.
- 5. Set the filter state to Testing first.
- 6. Match it to your traffic_type value from Step 1.
- 7. Click Create.
- 8. Test by visiting your site—check the Realtime report or Explorations for the “Test data filter name” dimension.
- 9. Once verified (may take 24-36 hours), switch to Active for permanent exclusion.
Pro tip: If you’re on dynamic IPs, use the “What’s my IP” link in GA4 or tools like whatismyip.com to grab your current address.
Expert Tips: Avoiding Common Mistakes and Advanced Tweaks
As someone who’s audited dozens of GA4 setups, I can tell you beginners often skip testing, leading to over-filtering and lost data. Always start in Testing mode—refresh your browser and verify in Realtime reports. Another pitfall: Forgetting IPv6 addresses, which are increasingly common in 2025 with 5G rollouts.
For advanced users, layer filters with regex for complex patterns (though not directly in IP fields) or create multiple rules for global teams. Integrate with Notion AI for documenting your filters, or automate alerts via Zapier if traffic spikes oddly. And hey, if your team’s remote, poll everyone for their IPs—it’s low-tech but effective.
IP Match Types Table: Quick Reference for GA4 Filters
| Match Type | Description | Example Use Case | Best For |
| Equals | Exact IP match | Single home office IP like 192.168.1.1 | Small teams with static IPs |
| Begins with | Matches starting digits | Office subnet like 10.0.0. | Corporate networks |
| Ends with | Matches ending digits | Dynamic IPs sharing endings | Variable home setups |
| Contains | Any substring match | Partial IPs like .local. | Flexible filtering |
| Is in range | CIDR notation for ranges | 172.16.0.0/12 | Large organizations with IP blocks |
| Matches regex | Regular expression | Complex patterns like ^192.168.[0-9]{1,3}.[0-9]{1,3}$ | Advanced users |
This table makes choosing the right type a breeze—pick based on your network setup for precise exclusion.
FAQs: IP Filters in Google Analytics 4 Answered
How do IP filters differ from GA3?
In GA3, you used view filters; GA4 uses data streams and permanent exclusions for cleaner processing. No more retroactive fixes!
Can I filter app traffic too?
No, IP filters apply only to web streams. For apps, use developer mode or custom parameters.
What if my IP changes frequently?
Use broader ranges or regex, or switch to user-ID based filtering for dynamic environments.
Is there a limit to filters in GA4?
Up to 10 data filters per property—plenty for most, but prioritize wisely.
How long until filters take effect?
24-36 hours for full propagation; test early to avoid data gaps.
Explore more smart tutorials and tools like IP Checker and Advanced IP Scanner at TheDigitalHowTo.com — where tech gets simple.